
Day 3
- Day 3 map link
- 352km driven
- Vestrahorn 10:30~11:50am
- Jökulsárlón Iceberg Lagoon 1:00-1:20pm
- Jökulsárlón Icebergs on black sand beach 1:20-1:55pm
- Fjallsárlón Glacier Lagoon 2:05~2:30pm
- Svartifoss 3:20-4:30 (about a 15~20 minute hike for us)
- Had a snack/lunch at the Skaftafell visitor center (pick up a free map of the area!)
- Fossálar 5:30-5:50pm (killed camera battery #3)
- Vik groceries 7:00-7:40pm
- Seljavallalaug hot spring 8:15-945pm
-
- Camping at Gljúfrafoss arrive at 10:15pm, showers and in bed by 11pm.
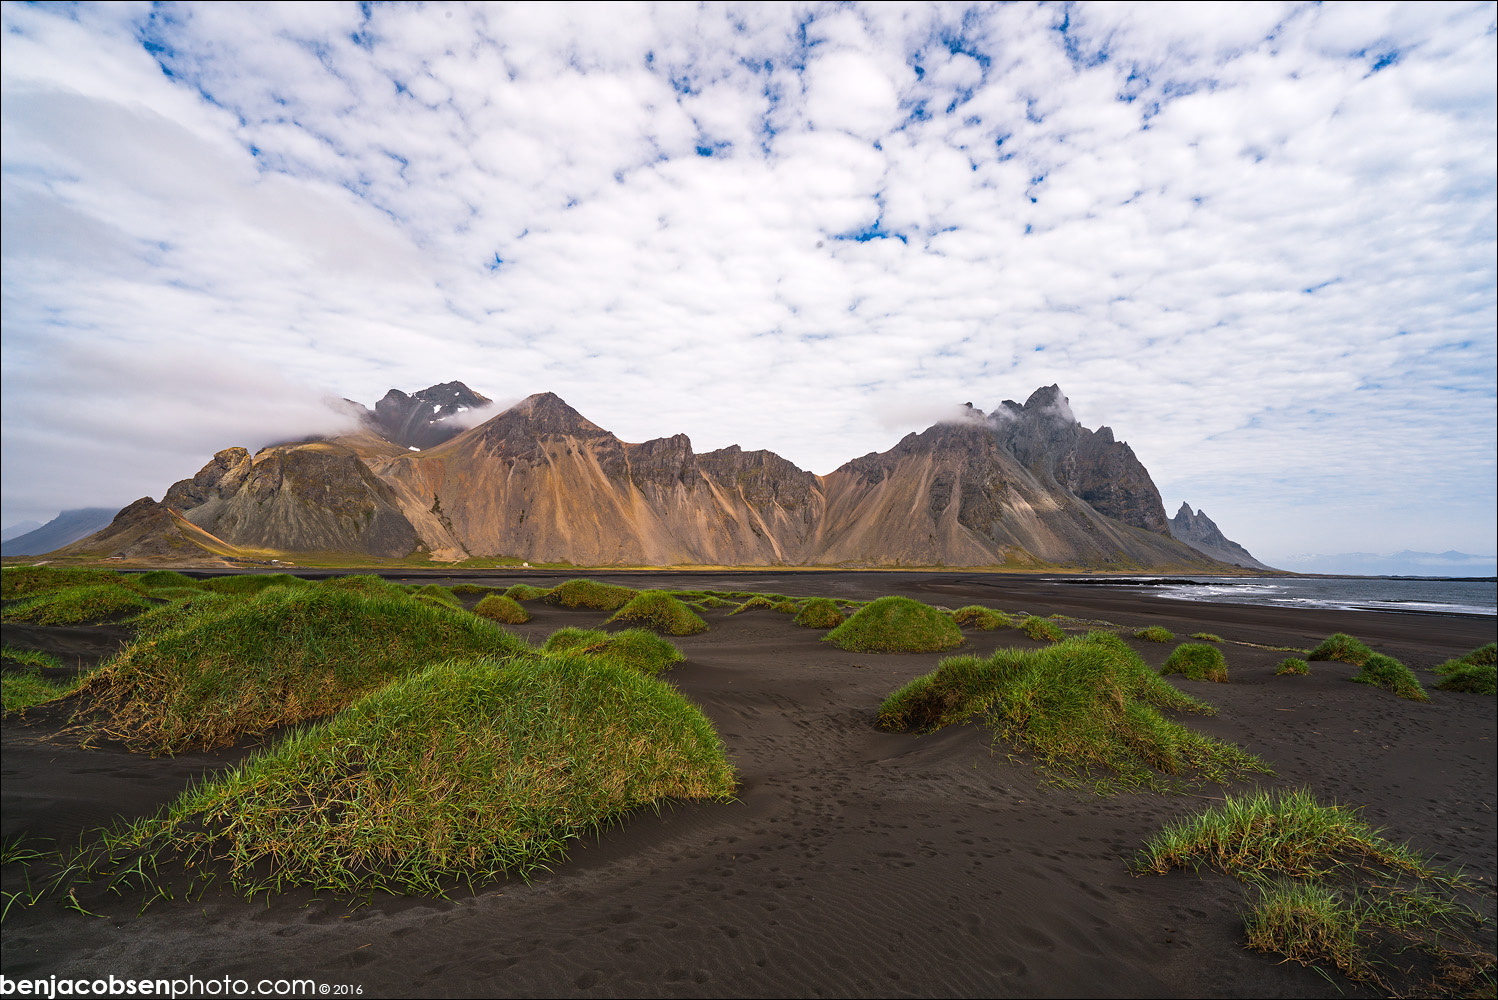 Monday we were up at 8:45am. We had our coffee in the shop at the campground with Linda then headed out around 9:45am. We headed off to Vestrahorn and arrived there around 10:30am. Vestrahorn is a few KM off the paved road to get to the Viking Cafe where you pay an 800kr per person entrance fee to drive down to the view of Vestrahorn. You also get to walk into their viking village (it’s a set for a movie, neat but not historic, skip if short on time). The Viking Cafe is also a campground with showers so you could potentially stay here for the night but it’s effectively a parking lot for campers (no room to spread out/privacy) and their showers “work but aren’t the best in the world”… The nice thing though is if you pay to camp here showers and admission to the road are included in their price which is around 1,000kr (that’s what I’m finding online, I didn’t write it down). It’s less expensive to camp here as you get the camping and access to the beach for about the same as camping in Höfn but it’s not as nice. The drive out to the beach view of Vestrahorn is a washboard dirt road so make sure all your things are packed away in the camper or they’ll be falling (my cell phone holder rattled off the vent!). Vestrahorn is an amazing view. The dunes are fun to explore and it’s a MASSIVE black sand beach.
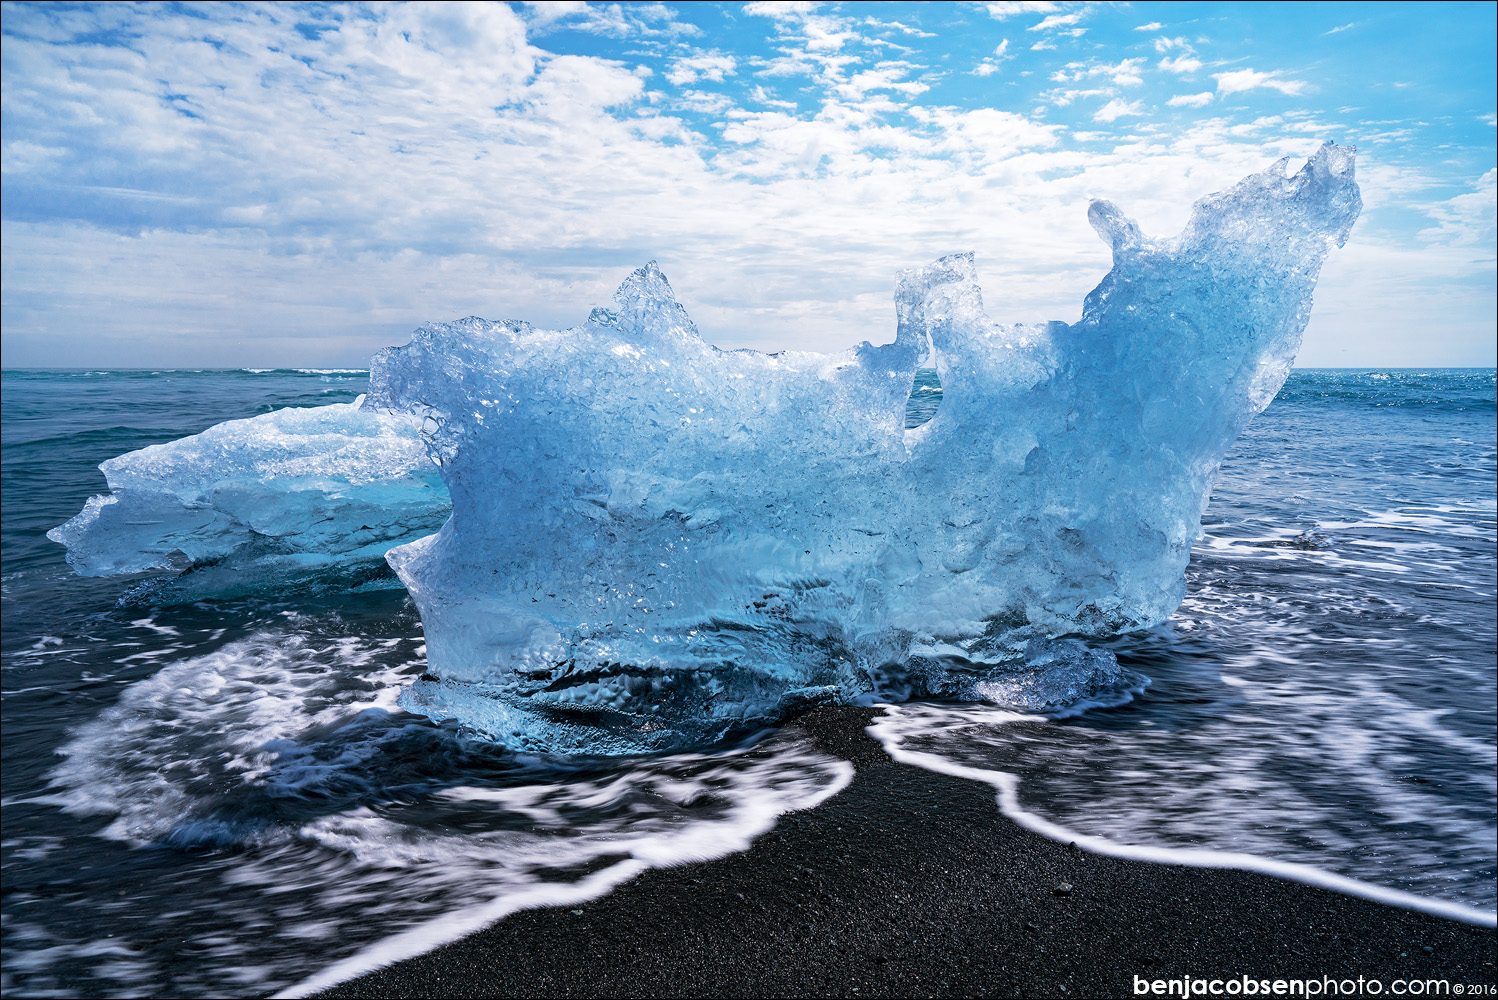 After Vestrahorn we headed back to Jökulsárlón for another visit at the lagoon (very short, basically the same as the day before) but also to visit the beach on the west side of the bridge hoping for more ice the second time around. I’d been told the ice on the beach changes with the tides and they were right. There was nothing there the night before and now it was covered with ice of all shapes and sizes. I found a few pieces to showcase the amazing blue color and then a final piece that had a wonderful shape to it. I have a TON of images of this ONE “iceberg” and varying waves around it. It’s worth planning some time here to walk down the beach and find some great looking ice and just watch the waves move things around. Don’t get too close or you’ll end up with wet boots (just ask Nikki!). I wore my crocs and loved being able to not worry about the waves but BE CAREFUL and know that the water is painfully cold even if it’s only on your feet!!!
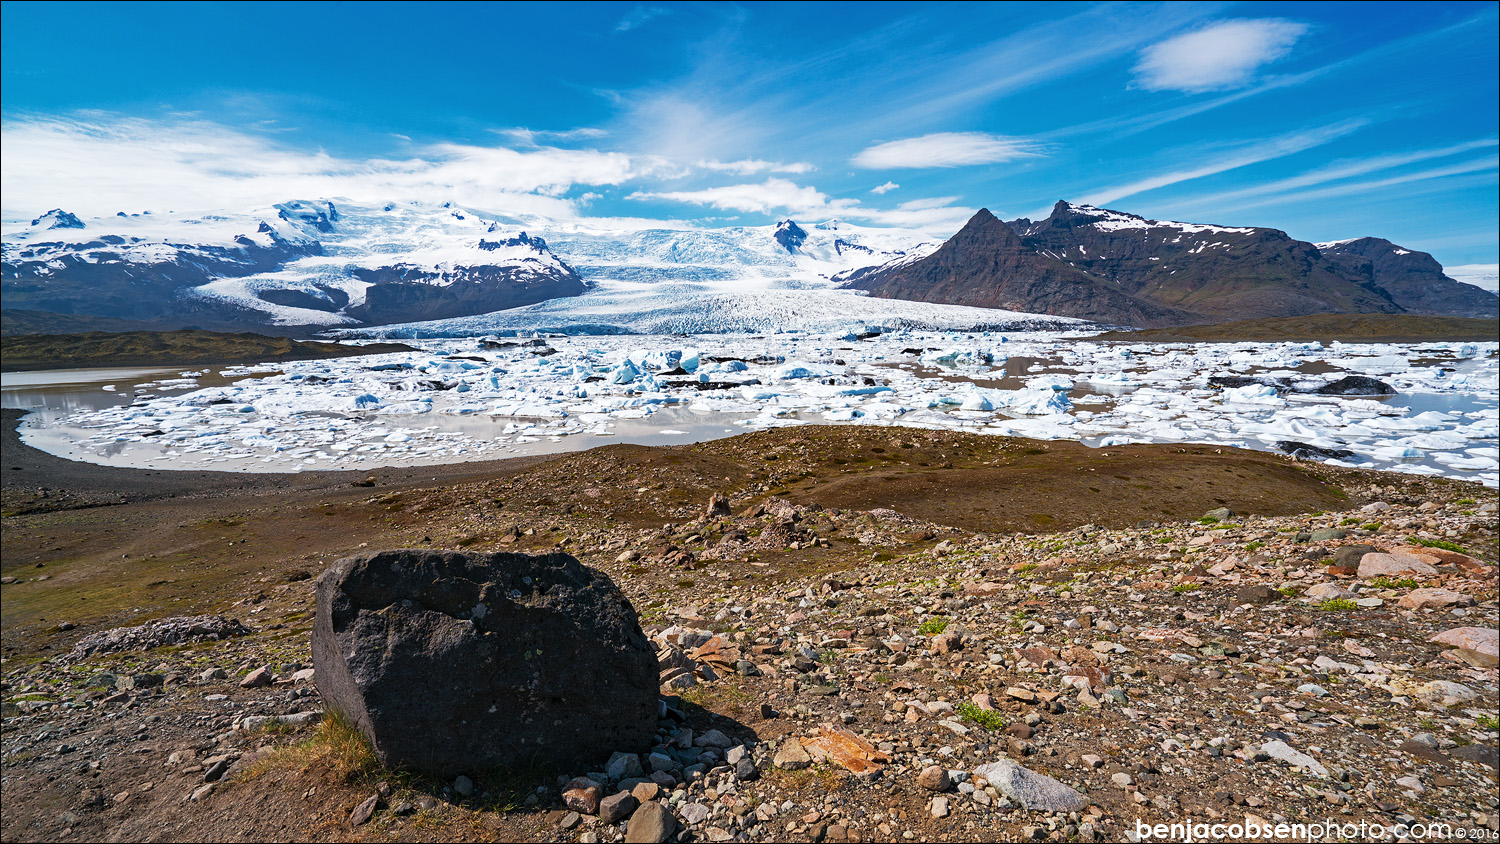 After Jökulsárlón we headed over to Fjallsárlón which is another glacier/iceberg lagoon. Fjallsárlón has a better backdrop -vs- Jökulsárlón but the water is more coffee colored and there’s less “action” with a smaller outlet for water so things are moving less. It’s worth seeing and hiking up the hill for a few pictures with the much more dramatic background but I’d expect to spend a lot more time at Jökulsárlón. There are no bathrooms here though FWIW but they do run boat tours here as well and there was a helicopter parked for what I’d assume to be tours.
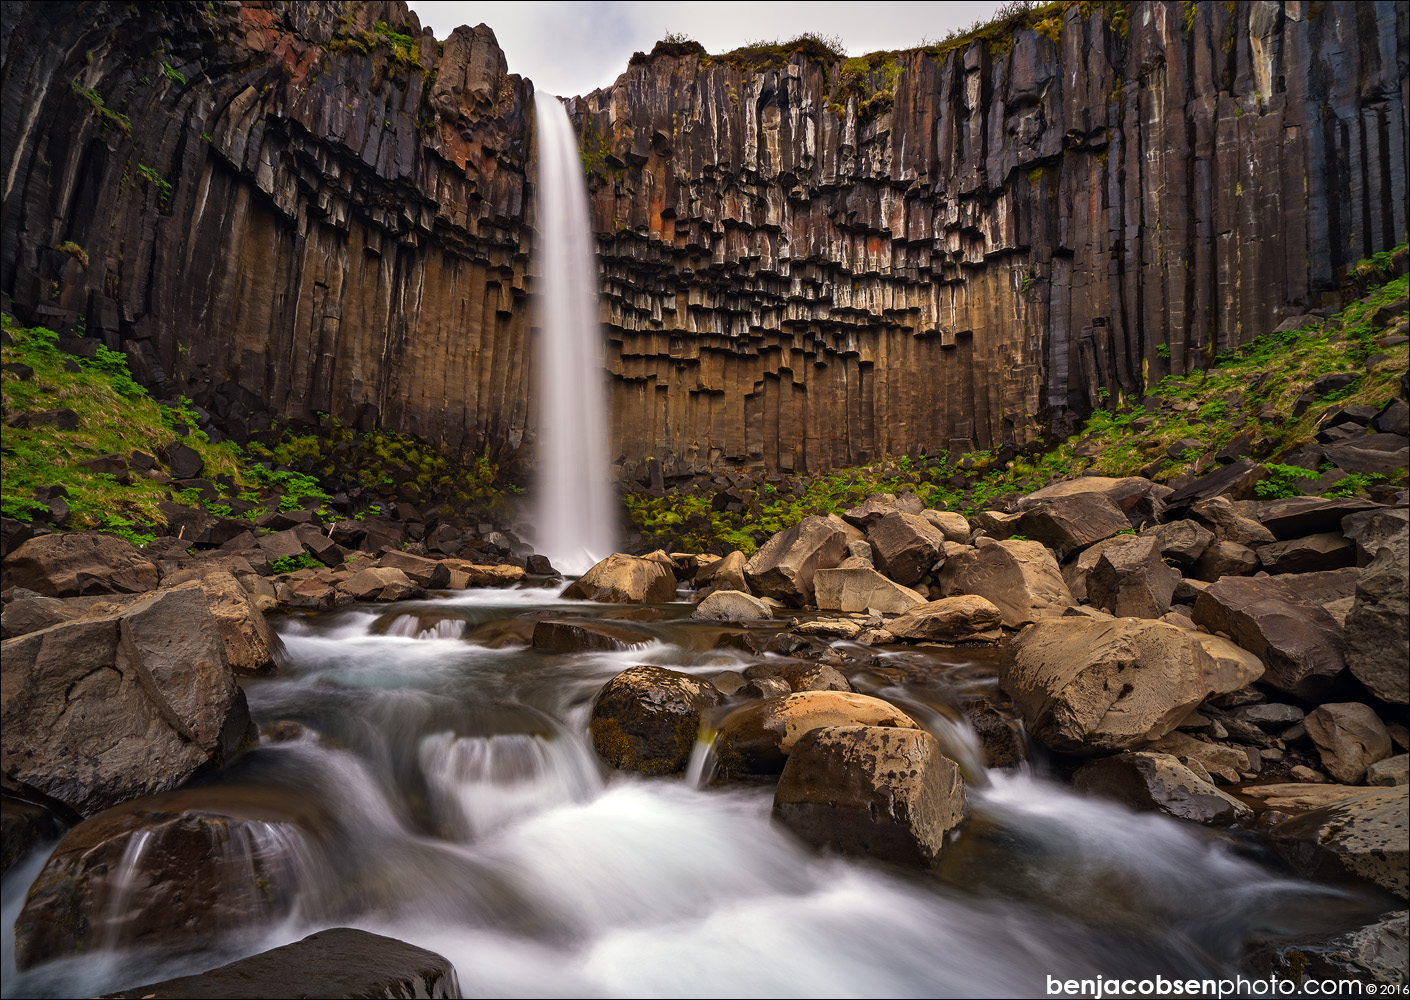 After Fjallsárlón we headed to Svartifoss. Svartifoss holds a special place for me because it’s the waterfall that set the ball in motion for our Iceland trip. I’d seen a photo of it long ago on Flickr and decided I wanted to go there some day myself. I didn’t realize it was in Iceland at the time! Arriving in Skaftafell there’s a massive visitor center for the whole area with lots of parking (but LOTS of cars, the close lot was full). To hike to Svartifoss drive past this center (although you might want to stop and grab their awesome/free map) to the parking lot down the road as it shortens the hike a bit. We made it up to Svartifoss in 15~20 minutes. There’s a viewing platform that’s swarmed with people and then a few photographers will be in the river basically just short of the platform. I shot from two different locations along the river as well as grabbing a few images from the platform just to show the different angles. The view here in incredible with the towering basalt columns and green moss lining the bottom of the falls. After enjoying Svartifoss we hiked down to the camper and headed to the Skaftafell visitor center for a bathroom break, to get the free map and to grab a bit to eat.
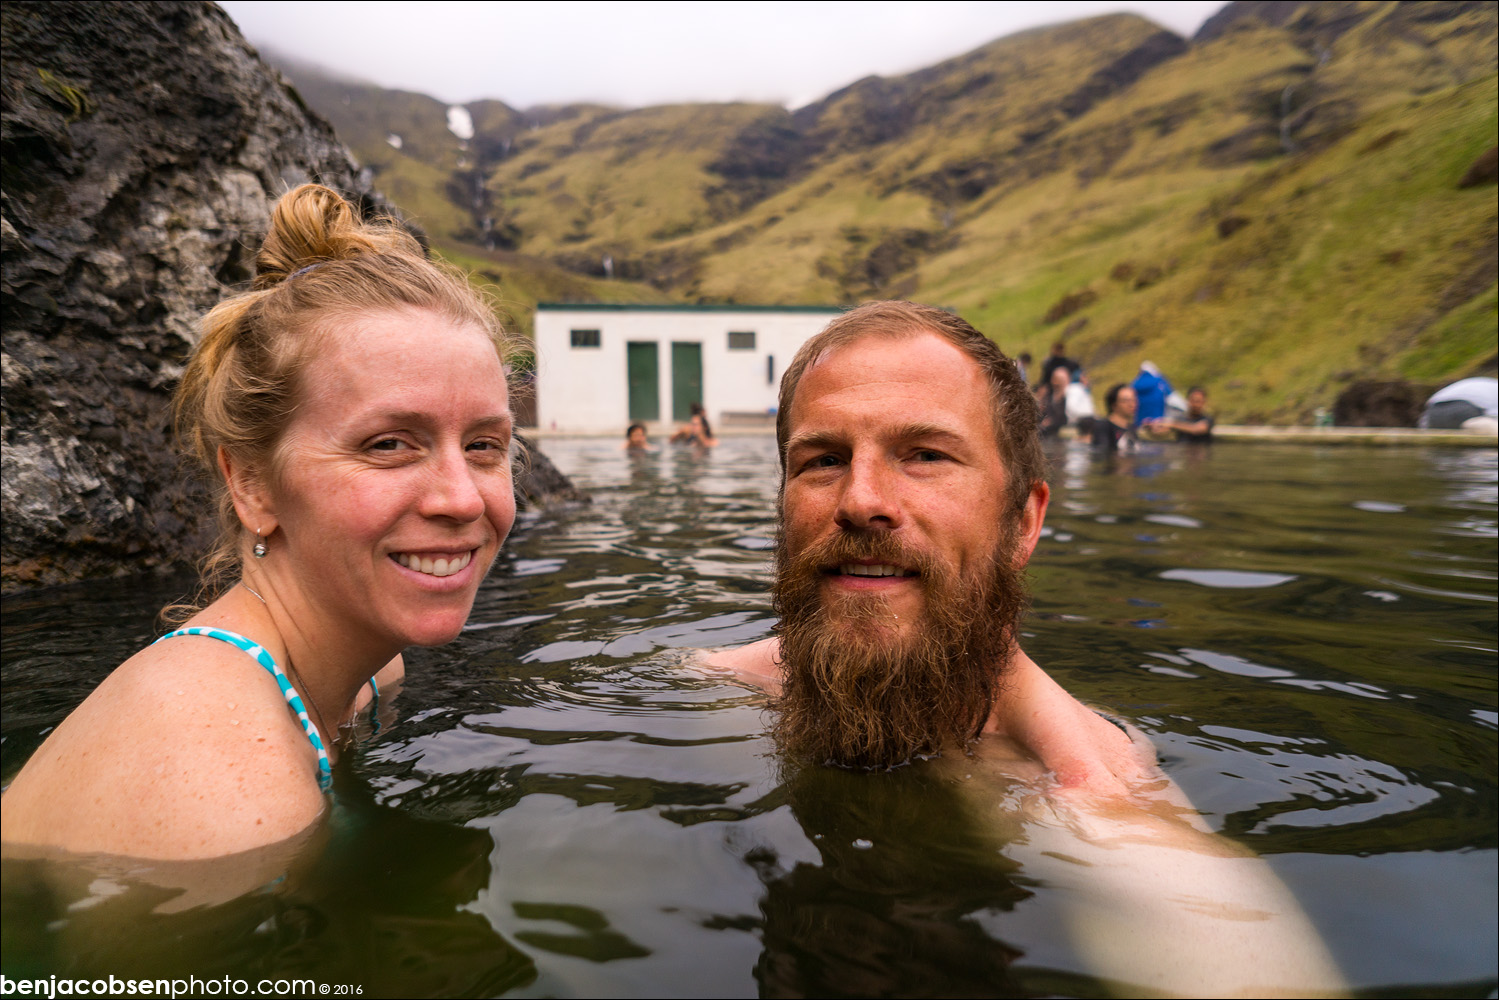
From here we headed off to Vik with a planned stop in Fossálar which was a small waterfall I’d noticed on the side of the road the day before. Fossálar was well worth the stop as it’s a great looking small set of falls but it’s also got water flowing through the rocks and coming out of holes you can’t even tell are there. Water just comes out of the side of the bank of the river! It’s quite fun to see and walk around as it’s a very accessible location. After a quick stop at Fossálar we headed back to Vik to grab some fresh groceries for dinner and then headed off to Seljavallalaug for a soak in the hot springs. Seljavallalaug was an easy drive in off route 1 and a quick hike where I counted 18 waterfalls in the canyon above the valley the hot spring is in. There’s a small building there to change into your suit but no bathroom or showers. It was fun but we were exhausted and knowing we still had a bit to drive to the campground we left after about a half hour. Another thing we didn’t really realize from the guides or pictures is the water here is very green and you can’t see more than a few inches in it. We would probably skip this location for either the hot river or even just hot pools at the various pools in each town (pools have very strict rules about showering before you go in as they don’t use chemicals in Iceland pools but the bonus is this means you get a shower which is key when camping!).
After our dip in Seljavallalaug we headed back to the same campground as the first night. While it would of been nice to see a different location we knew this was a good location with showers and coffee and it was just an easy answer to the camp site question. We got a better location for the camper (not that the first was bad!) and enjoyed another night with Gljúfrafoss about 100 yards out the window.
Day two and Day three are very similar in terms of the route driven. The only difference is on day three we went another ~20 minutes east to get to Vestrahorn. We then backtracked from that point all the way back to the same campground. This obviously isn’t ideal in terms of seeing the most of Iceland but if you look at our actual stops on both days Jökulsárlón is the only location we visited both ways. This is because the tides change the amount of ice on the beach hourly and we didn’t have anything worth seeing there on day 2 but day 3 there was plenty of ice to see. Other than that we drove the same road each way but it actually is quite different each direction because you see into different valleys from each direction. Basically, if you’re going to do an out and back trip like we did I don’t recommend against it, just make sure you take the sights you want to see along the way and divide them up so you’ve got some things to see each way.


Leave a Reply